Managing Storage
As a cloud-native data management platform, Arraylake stores all data in cloud object storage. See Storage in the Concepts section to learn more about how Arraylake works.
An Arraylake BucketConfig houses the settings for one or more object storage locations.
Each BucketConfig
holds the configuration (e.g. object store bucket name, key prefix, access
credentials, etc.) that enables the Arraylake client
and services to read and write array data.
All the Repositories that use a given bucket config are safely
isolated from each other. A BucketConfig allows organizations to easily and
securely manage storage configuration that is shared between repositories. An
organization may have multiple bucket configurations.
Important properties for BucketConfigs include:
nickname: a nickname for easy referencing in code, on the command line, and on the webplatform: the object storage providerauth_config: additional authorization inputs for the storage backendname: the name of the bucket in object storage where chunks will be storedprefix: an optional key prefixextra_config: additional configuration options for the storage backend (e.g.endpoint_url)
For convenience, The Arraylake Python client also supports expressing these last three components
in URI form (i.e. {platform}://{name}[/{prefix}]). Each BucketConfig must have
a unique URI. Arraylake will not allow you to create two BucketConfigs pointing to
the same location in object storage.
You can modify a BucketConfig as much as you like so long as there are no Repos
that rely on it. Once it is in use by one or more Repos, only the BucketConfig's
nickname can be modified.
Create a BucketConfig
If you're just getting started, you probably only need one bucket config for
your entire organization (see Organizations, Users, and Access Management for more
detail). For the purposes of this example, our org name will be earthmover. If
running these commands interactively, replace earthmover with your org name.
For this example, we are going to create a bucket config nicknamed production
to hold the chunks for all the repositories with production-quality datasets.
- Web App
- Python
- Python (asyncio)

The create bucket form.
In the web app, Org Admins can add BucketConfigs by clicking on the "Add Bucket" button in the Buckets section of the Organization Settings page (see below).
from arraylake import Client


client = Client()

client.create_bucket_config(
  org="earthmover",
  nickname="production",
  uri="s3://my-production-data",
  extra_config={'region_name': 'us-east-1'}
)
from arraylake import AsyncClient


aclient = AsyncClient()

await aclient.create_bucket_config(
  org="earthmover",
  nickname="production",
  uri="s3://my-production-data",
  extra_config={'region_name': 'us-east-1'}
)
Object store credentials can be managed in three ways: anonymous credentials, role-based access delegation, and hash-based message authentication codes (HMAC).
By default, anonymous authorization is used for object storage access. Under this configuration, Arraylake does not manage bucket credentials. The bucket must allow public read access, and writing to the bucket via Arraylake is not allowed. This authorization type is useful for public buckets and bucket mirrors.
For buckets which you wish to write to from arraylake, or for non-public buckets, you must use HMAC or role-based access delegation.
For all platforms, Arraylake can store HMAC keys for bucket access ("hmac"). Under this bucket configuration, Arraylake stores the access key ID and secret access key ID needed to access the chunkstore bucket.
For AWS S3, Google Cloud Storage, Cloudflare R2, and Microsoft Azure Blob Storage, Earthmover supports a "role-based access delegation" model for managing access to object store buckets. In this configuration, object store credentials are not stored directly; instead, Earthmover's authorization service generates temporary, scoped credentials by assuming a delegated access role. This may involve an IAM role (AWS), cross-account service account impersonation (Google Cloud), an API token scoped to a specific service endpoint (Cloudflare R2), or user delegation SAS tokens (Microsoft Azure) depending on the cloud provider.
Instructions on how to configure these types of credentials are below.
Configuring Anonymous Credentials
Under this bucket credential configuration, the bucket must allow public read-only access. Repos with buckets configured with anonymous credentials cannot be written to from Arraylake.
Configuring HMAC
Under this bucket credential configuration, credentials are stored directly in Arraylake. This works for all s3-compatible object storage services, including GCS (see Configuring GCS Buckets with HMAC Credentials). The credentials provided to arraylake must have access to the object store bucket associated with the bucket config.
HMAC bucket credentials are less secure than other authorization methods, in that they cannot be dynamically downscoped to a specific prefix after creation.
This means that if the HMAC credentials were originally created with more access than you intended, Arraylake cannot alter the credentials to apply only to the prefix specified in your bucket configuration. Arraylake also cannot verify that these credentials only apply to the requested prefix. This could lead to you accidentally exposing wider bucket permissions than you realize. For more fine-grained permissions, please use delegated credentials as your Arraylake authorization method instead of HMAC credentials.
To configure Arraylake to use HMAC credentials, create a BucketConfig for your bucket, setting the credential type to "hmac" and passing in the access_key_id and secret_access_key HMAC credentials. These keys must be able to access the object store bucket.
- Web App
- Python
- Python (asyncio)

The create bucket form using HMAC access delegation.
from arraylake import Client


client = Client()

client.create_bucket_config(
  org="earthmover",
  nickname="production",
  uri="s3://my-production-data",
  extra_config={'region_name': 'us-east-1'},
  auth_config={
    "method": "hmac",
    "access_key_id": "my-access-key-id",
    "secret_access_key": "my-secret-access-key"
  }
)
from arraylake import AsyncClient


aclient = AsyncClient()

await aclient.create_bucket_config(
  org="earthmover",
  nickname="production",
  uri="s3://my-production-data",
  extra_config={'region_name': 'us-east-1'},
  auth_config={
    "method": "hmac",
    "access_key_id": "my-access-key-id",
    "secret_access_key": "my-secret-access-key"
  }
)
Configuring GCS Buckets with HMAC Credentials
First, set up a set of HMAC keys following this tutorial from Google Cloud. Note that in Google Cloud, HMAC keys are used for interoperability (e.g. compatibility with Amazon S3) and are not supported by GCS-native storage libraries.
To configure a GCS bucket to use HMAC credentials in Arraylake, you must set the bucket platform to S3 Compatible instead of Google Cloud. You must also set the credential type to HMAC, pass in the access_key_id and secret_access_key HMAC credentials generated in the above step, and set the endpoint url in the extra configuration to https://storage.googleapis.com. The bucket will be accessed using S3 APIs using the provided HMAC keys.
- Web App
- Python
- Python (asyncio)
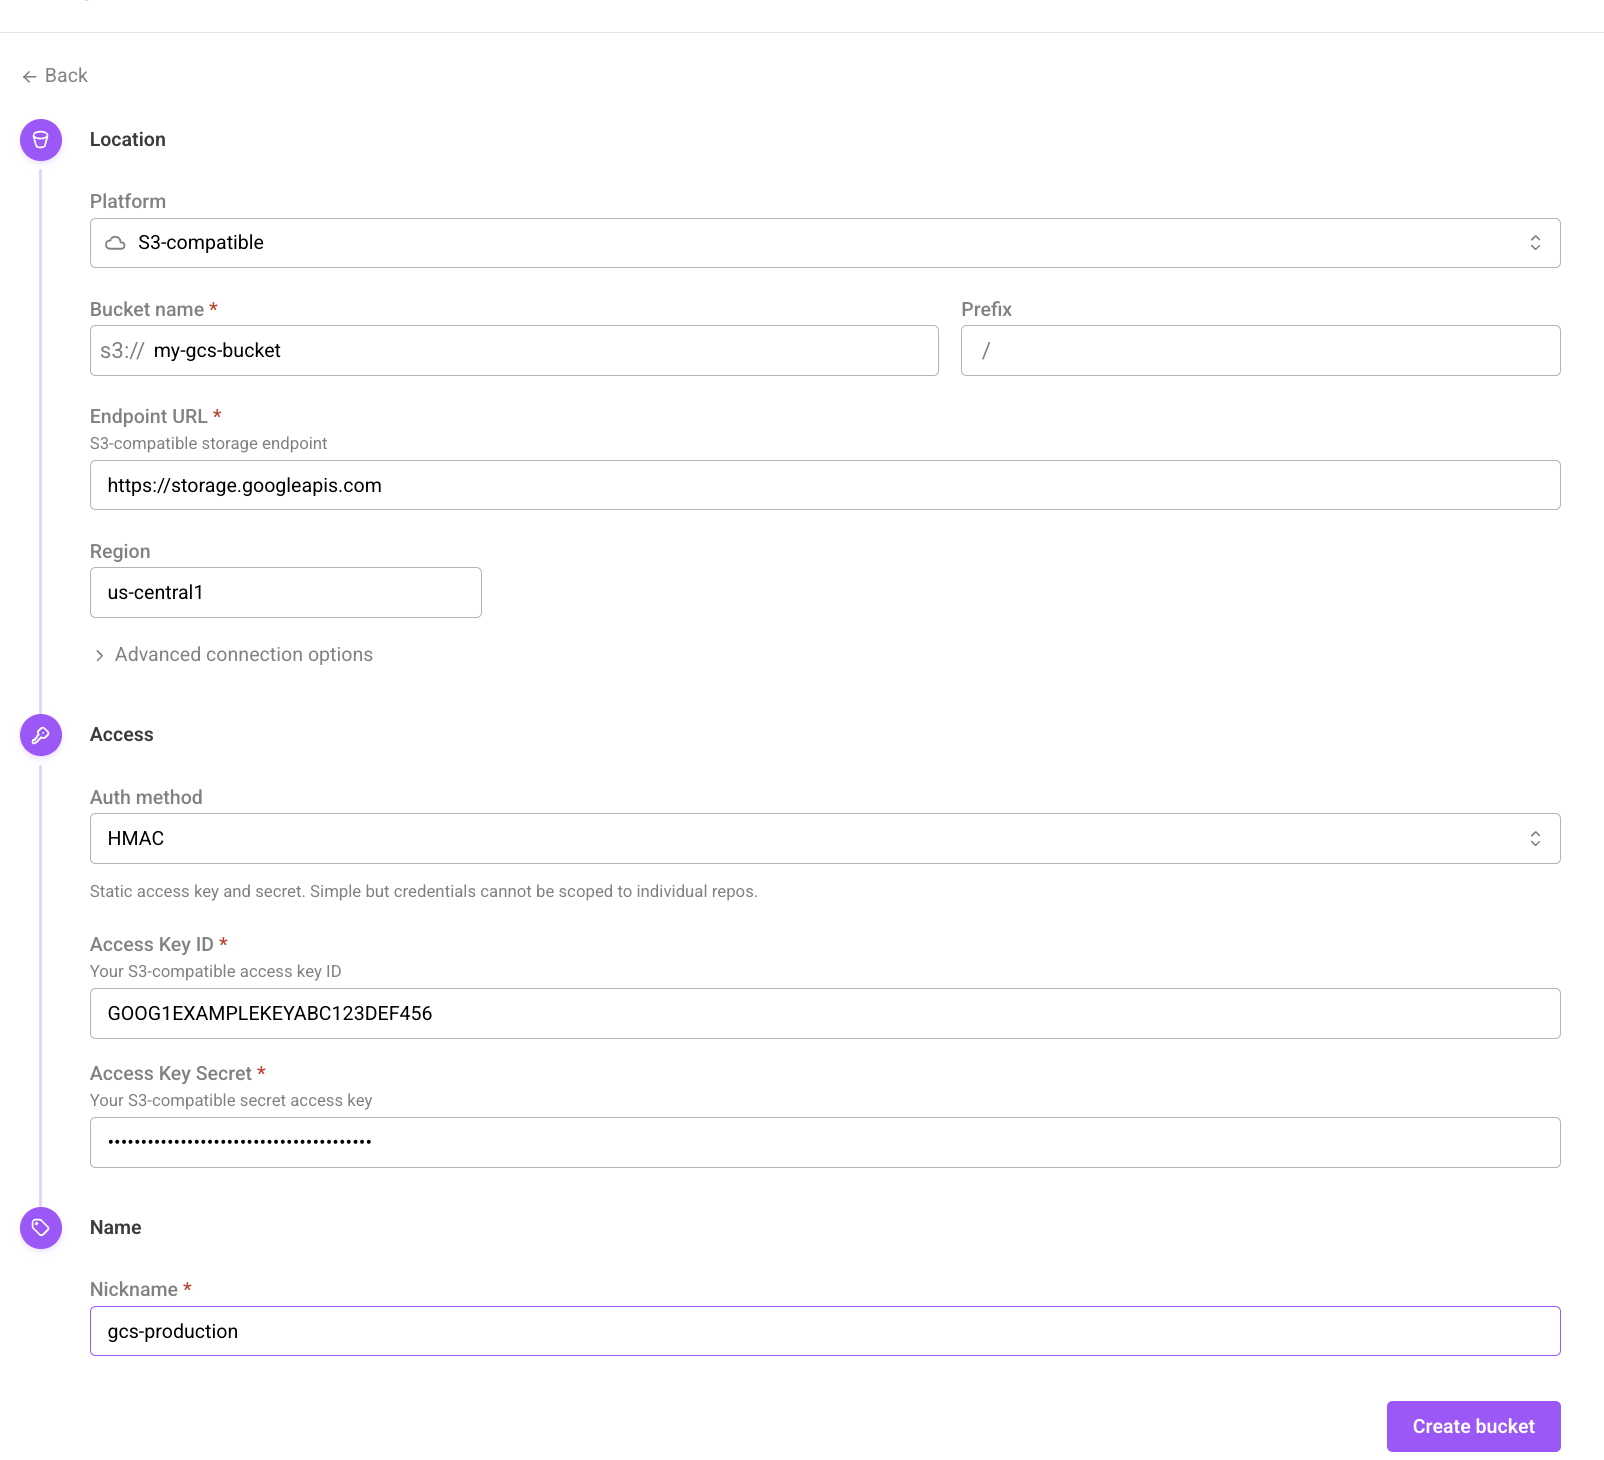
The create bucket form using HMAC access delegation for GCS buckets.
from arraylake import Client


client = Client()

client.create_bucket_config(
  org="earthmover",
  nickname="gcs-hmac-bucket",
  uri="s3://my-gcs-bucket",  # use s3:// in place of gs://
  extra_config={'endpoint_url': 'https://storage.googleapis.com'},
  auth_config={
    "method": "hmac",
    "access_key_id": "my-access-key-id",
    "secret_access_key": "my-secret-access-key"
  }
)
from arraylake import AsyncClient


aclient = AsyncClient()

await aclient.create_bucket_config(
  org="earthmover",
  nickname="gcs-hmac-bucket",
  uri="s3://my-gcs-bucket",  # use s3:// in place of gs://
  extra_config={'endpoint_url': 'https://storage.googleapis.com'},
  auth_config={
    "method": "hmac",
    "access_key_id": "my-access-key-id",
    "secret_access_key": "my-secret-access-key"
  }
)
Configuring Credential Vending
Under this bucket credential configuration, Earthmover is given limited access to the bucket's cloud storage account for the purposes of generating temporary, scoped credentials for bucket access. This works for AWS S3 buckets (see AWS S3 buckets), Google Cloud Storage buckets (see Google Cloud Storage buckets), Cloudflare R2 buckets (see Cloudflare R2 buckets), and Azure Blob Storage (see Azure Blob Storage).
For Icechunk repos under this bucket policy,
scatter_initial_credentialswill be set toTrue. See the configuration docs for more information.
AWS S3 Buckets
To leverage the role-based access delegation bucket authorization, you must configure an AWS IAM role with appropriate permissions to the S3 bucket used to store your arraylake data and grant Earthmover’s authorization service the ability to assume the role.
After assuming this role, the Earthmover authorization service can generate temporary, scoped credentials to access this S3 bucket.
These credentials have a lifetime of 1 hour and will automatically refresh when expired.
IAM Policy
Earthmover requires the following actions on the S3 bucket:
s3:ListBuckets3:GetBucketLocations3:GetBucketNotifications3:PutBucketNotifications3:GetObjects3:PutObjects3:PutObjectAcls3:DeleteObjects3:AbortMultipartUpload
Create an IAM policy using the following permissions JSON template (substituting <my-arraylake-bucket> with your S3 bucket) to grant these actions. This policy will be attached to the IAM role in the next step.
{
    "Version": "2012-10-17",
    "Statement": [
        {
            "Effect": "Allow",
            "Action": [
                "s3:ListBucket",
                "s3:GetBucketLocation",
                "s3:GetBucketNotification",
                "s3:PutBucketNotification"
            ],
            "Resource": [
                "arn:aws:s3:::<my-arraylake-bucket>"
            ]
        },
        {
            "Effect": "Allow",
            "Action": [
                "s3:PutObject",
                "s3:GetObject",
                "s3:DeleteObject",
                "s3:PutObjectAcl",
                "s3:AbortMultipartUpload"
            ],
            "Resource": [
                "arn:aws:s3:::<my-arraylake-bucket>/*"
            ]
        }
    ]
}
IAM Role
Step 1: Select trusted entity
Create a new AWS IAM role using the following settings:
- Trusted Entity Type:
AWS Account - AWS Account ID:
842143331303(Earthmover's AWS account ID) - External ID:
<my-shared-secret>(any string you share only with Earthmover) - MFA is not supported at this time
Step 2: Add permissions
Select the IAM policy created above to attach it to this role.
Step 3: Name, review, and create
-
Role details: Create a meaningful role name and description.
-
Select trusted entities: Copy the below trust policy into the role's
Trust Policyto allow the Earthmover authorization service the ability to assume and tag this role:
{
    "Version": "2012-10-17",
    "Statement": [
       {
           "Effect": "Allow",
           "Principal": {
               "AWS": "arn:aws:iam::842143331303:root"
           },
           "Action": "sts:AssumeRole",
           "Condition": {
               "StringEquals": {
                   "sts:ExternalId": "<my-shared-secret>"
               },
               "ArnLike": {
                   "aws:PrincipalArn": "arn:aws:iam::842143331303:role/EarthmoverSignerServiceRole-production"
               }
           }
       },
       {
          "Effect": "Allow",
          "Principal": {
              "AWS": "arn:aws:iam::842143331303:root"
          },
          "Action": "sts:TagSession",
          "Condition": {
              "ArnLike": {
                  "aws:PrincipalArn": "arn:aws:iam::842143331303:role/EarthmoverSignerServiceRole-production"
            }
          }
        }
    ]
}
- Tags:
Add any tags that you want associated this with this policy.
Configuring Arraylake to use an IAM Role
Once this IAM role has been created, you can create a BucketConfig for your bucket, setting the credential type to "Role-based access delegation" in the web app OR aws_customer_managed_role in Python and passing in your AWS account ID, shared secret (external_customer_id) and IAM role name (external_role_name) into the auth_config:
- Web App
- Python
- Python (asyncio)
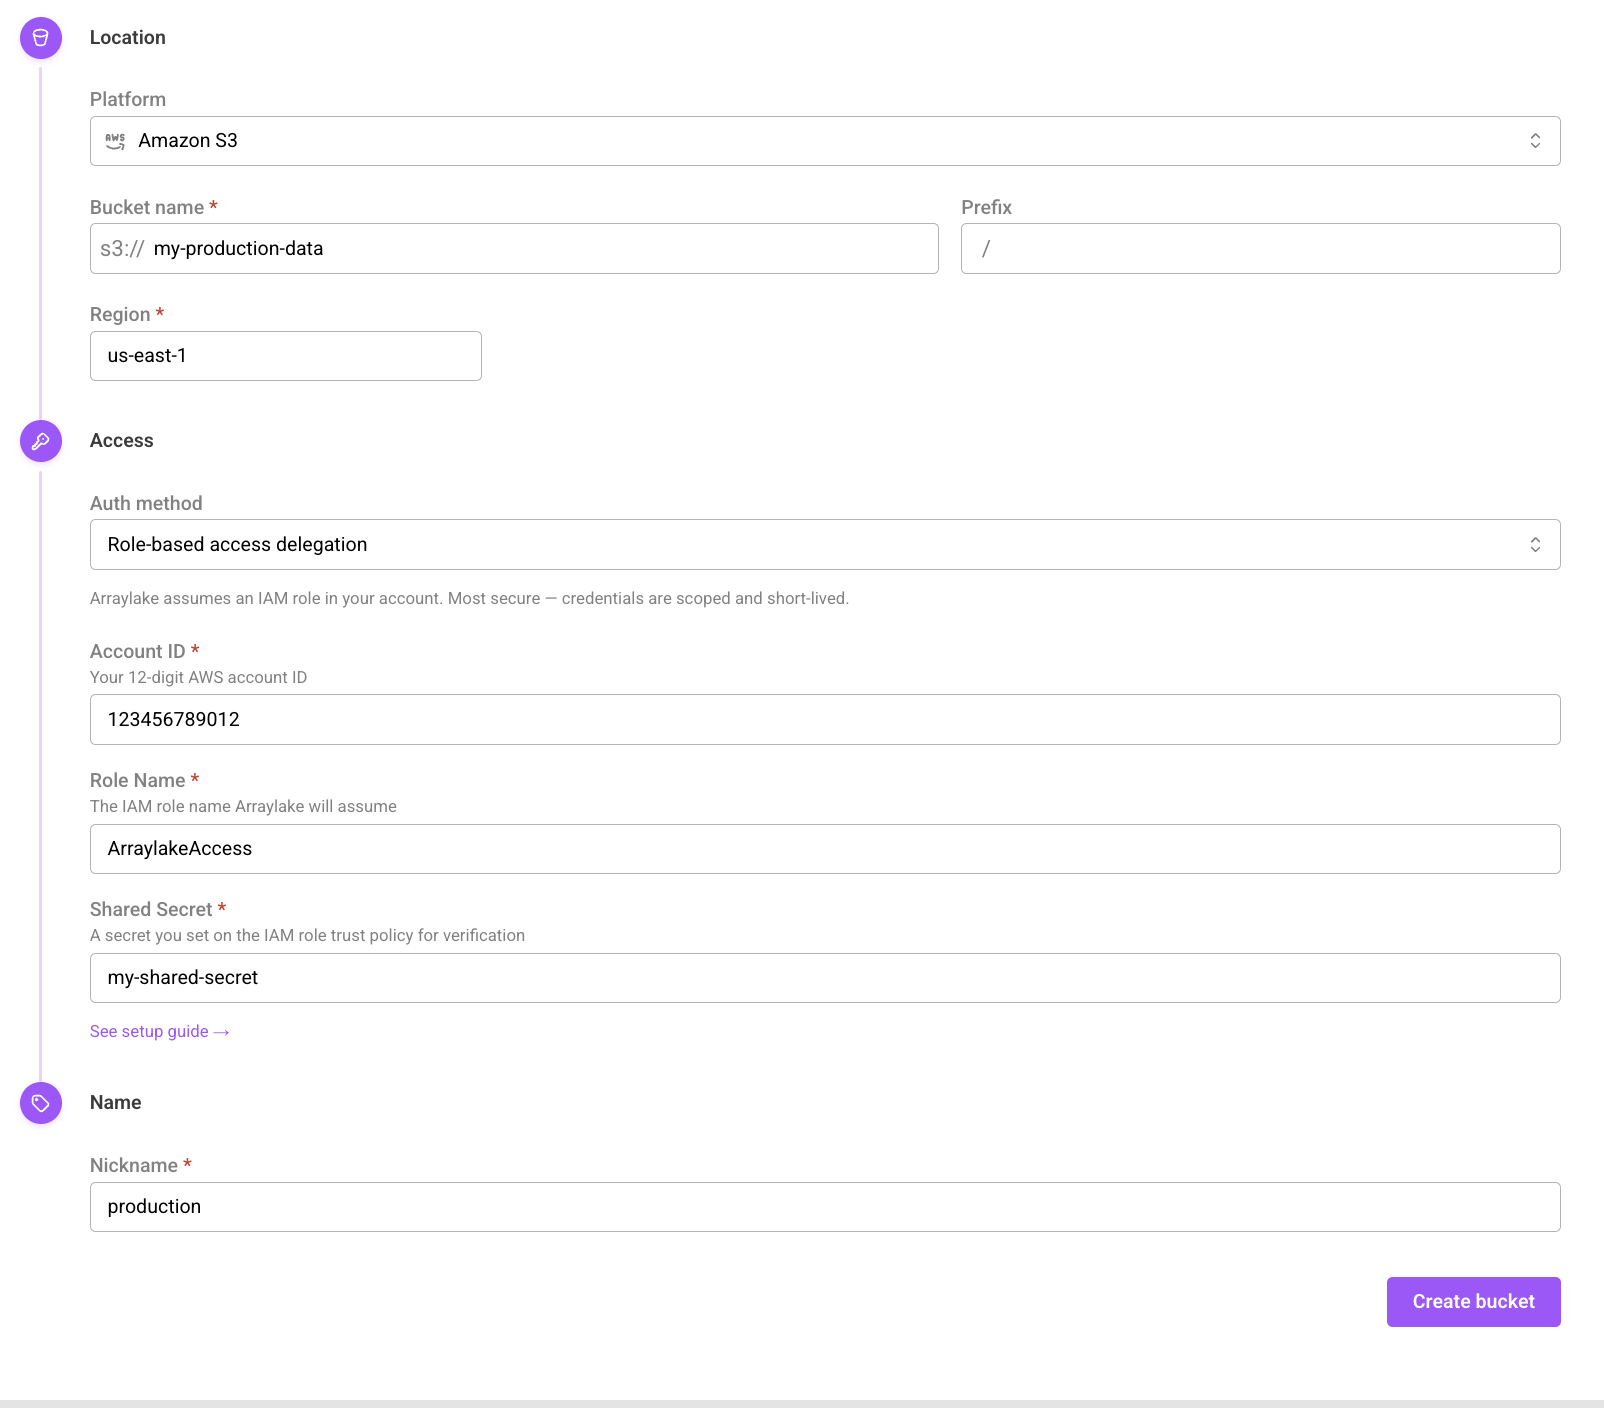
The create bucket form using role-based access delegation for AWS S3.
from arraylake import Client


client = Client()

client.create_bucket_config(
  org="earthmover",
  nickname="production",
  uri="s3://my-production-data",
  extra_config={'region_name': 'us-east-1'},
  auth_config={
    "method": "aws_customer_managed_role",
    "external_customer_id": "my-aws-account-id",
    "external_role_name": "my-iam-role-name",
    "shared_secret": "my-shared-secret",
  }
)
from arraylake import AsyncClient


aclient = AsyncClient()

await aclient.create_bucket_config(
  org="earthmover",
  nickname="production",
  uri="s3://my-production-data",
  extra_config={'region_name': 'us-east-1'},
  auth_config={
    "method": "aws_customer_managed_role",
    "external_customer_id": "my-aws-account-id",
    "external_role_name": "my-iam-role-name",
    "shared_secret": "my-shared-secret",
  }
)
That's it! You can now start interacting with your bucket via Arraylake which will manage S3 credentials via this IAM role.
Google Cloud Storage Buckets
For Google Cloud buckets, cross-account service account impersonation is used to give Earthmover's authorization service account temporary, scoped access to the GCS bucket.
To enable service account impersonation, you must configure a service account with appropriate permissions to the GCS bucket used to store your arraylake data and grant Earthmover’s authorization service the ability to impersonate the account.
After impersonating this role, the Earthmover authorization service account can generate temporary, scoped credentials to access this GCS bucket.
These credentials have a lifetime of 1 hour and will refresh automatically.
Step 1: Create a Service Account
- Go to the Google Cloud Console.
- Navigate to the IAM & Admin > Service accounts page.
- Click the Create Service Account button.
- Provide a name and ID for the service account, and click Create.
- Under Grant this service account access to project, grant the Service Account Token Creator role in the project. This will allow the service account to retrieve credentials from the impersonated account.
- Click Done to create the service account.
Step 2: Grant Earthmover Impersonation Access to the Service Account
- Navigate to the IAM & Admin > Service accounts page and click on the service account created above.
- Under the Principals with access tab, click Grant Access (at the top of the table of Principals)
- Add the
earthmover-signer-service@arraylake.iam.gserviceaccount.comservice account as a principal and grant it the Service Account Token Creator role in the project. - Click Save
Step 3: Grant Service Account Access to the Bucket
- Navigate to the Cloud Storage > Buckets page and click on the bucket you wish to give the service account access to. This bucket should correspond to the bucket config that you want to grant Arraylake access to.
- Under the Permissions tab, click Grant Access.
- Add the service account created in Step 1 (ie
my-al-service-account@my-project.iam.gserviceaccount.com) as a principal and grant it the Storage Object User role in the bucket. - Click Save
Configuring Arraylake to use a Google Service Account
Once you have created a service account with the appropriate permissions, you can create a BucketConfig for your bucket, setting the credential type to "Role-based access delegation" in the web app OR gcp_customer_managed_role in Python and passing in your service account (target_service_account) into the auth_config:
- Web App
- Python
- Python (asyncio)

The create bucket form using role-based access delegation for Google Cloud Storage.
from arraylake import Client


client = Client()

client.create_bucket_config(
  org="earthmover",
  nickname="production",
  uri="gs://my-production-data",
  extra_config={TODO},
  auth_config={
    "method": "gcp_customer_managed_role",
    "target_service_account": "my-service-account@my-project.iam.gserviceaccount.com"
  }
)
from arraylake import AsyncClient


aclient = AsyncClient()

await aclient.create_bucket_config(
  org="earthmover",
  nickname="production",
  uri="gs://my-production-data",
  extra_config={TODO},
  auth_config={
    "method": "gcp_customer_managed_role",
    "target_service_account": "my-service-account@my-project.iam.gserviceaccount.com"
  }
)
Cloudflare R2 Buckets
For Cloudflare R2 buckets, Earthmover uses Cloudflare’s Create Temporary Access Credentials API to obtain temporary, scoped credentials to access your R2 bucket.
To enable this credential delegation model, you must generate an API token with appropriate permissions from the R2 Object Storage dashboard in your Cloudflare account, and share it — along with your Cloudflare Account ID — with Earthmover. Earthmover’s authorization service will use this token to dynamically create short-lived credentials for accessing your R2 bucket.
These credentials have a lifetime of 1 hour and will automatically refresh when expired.
Step 1: Generate a Cloudflare Account-Owned API Token from the R2 Dashboard
See Cloudflare's API token documentation for additional help.
- Navigate to the R2 Object Storage > Overview page in your Cloudflare dashboard.
- On the right-hand dropdown, click
API, then clickManage API Tokens. You’ll be redirected to the API Tokens page within R2 Object Storage. - Click Create Account API Token.
- Give your token a description name (e.g.
earthmover-account-token) - Choose the required permissions level for Earthmover: Admin Read & Write.
The Admin Read & Write permission is necessary so that generated tokens can create, list, and delete buckets, edit bucket configuration, read, write, and list objects, and read and write access to data catalog tables and associated metadata. The Earthmover service will only use this token to access the specific bucket this token is associated with in Arraylake. However, Admin permissions do not allow restricting to a specific bucket. Use care when sharing this token.
- Set TTL to your preferred duration (Earthmover recommends rotating tokens periodically).
- Click Create Account API Token.
- Save the Token Value and S3 Access Key ID securely — you will provide these to Earthmover in the next step. You will not need the S3 Secret Access ID for this setup.
Share Configuration Details with Earthmover
Once you have created a Cloudflare Account API token and associated Access Key ID with the appropriate permissions, you can create a BucketConfig for your bucket.
If you did not copy the S3 Access Key ID in the above step, you can use the https://api.cloudflare.com/client/v4/user/tokens/verify API to extract the Parent Access Key ID from your Cloudflare Account API token.
- Web App
- Python
- Python (asyncio)
First, paste in the endpoint URL. This should look like https://YOUR-ACCOUNT-ID.r2.cloudflarestorage.com.
You can find your Account ID by navigating to the Cloudflare Dashboard > Accounts > your account > Copy Account ID.
Next, set the credential type to Role-based access delegation and enter the following values from the previous step:
| Cloudflare Value | Arraylake Field |
|---|---|
| Account ID | Account ID |
| Token Value | API Token |
| S3 Access Key ID | Parent Access Key ID |
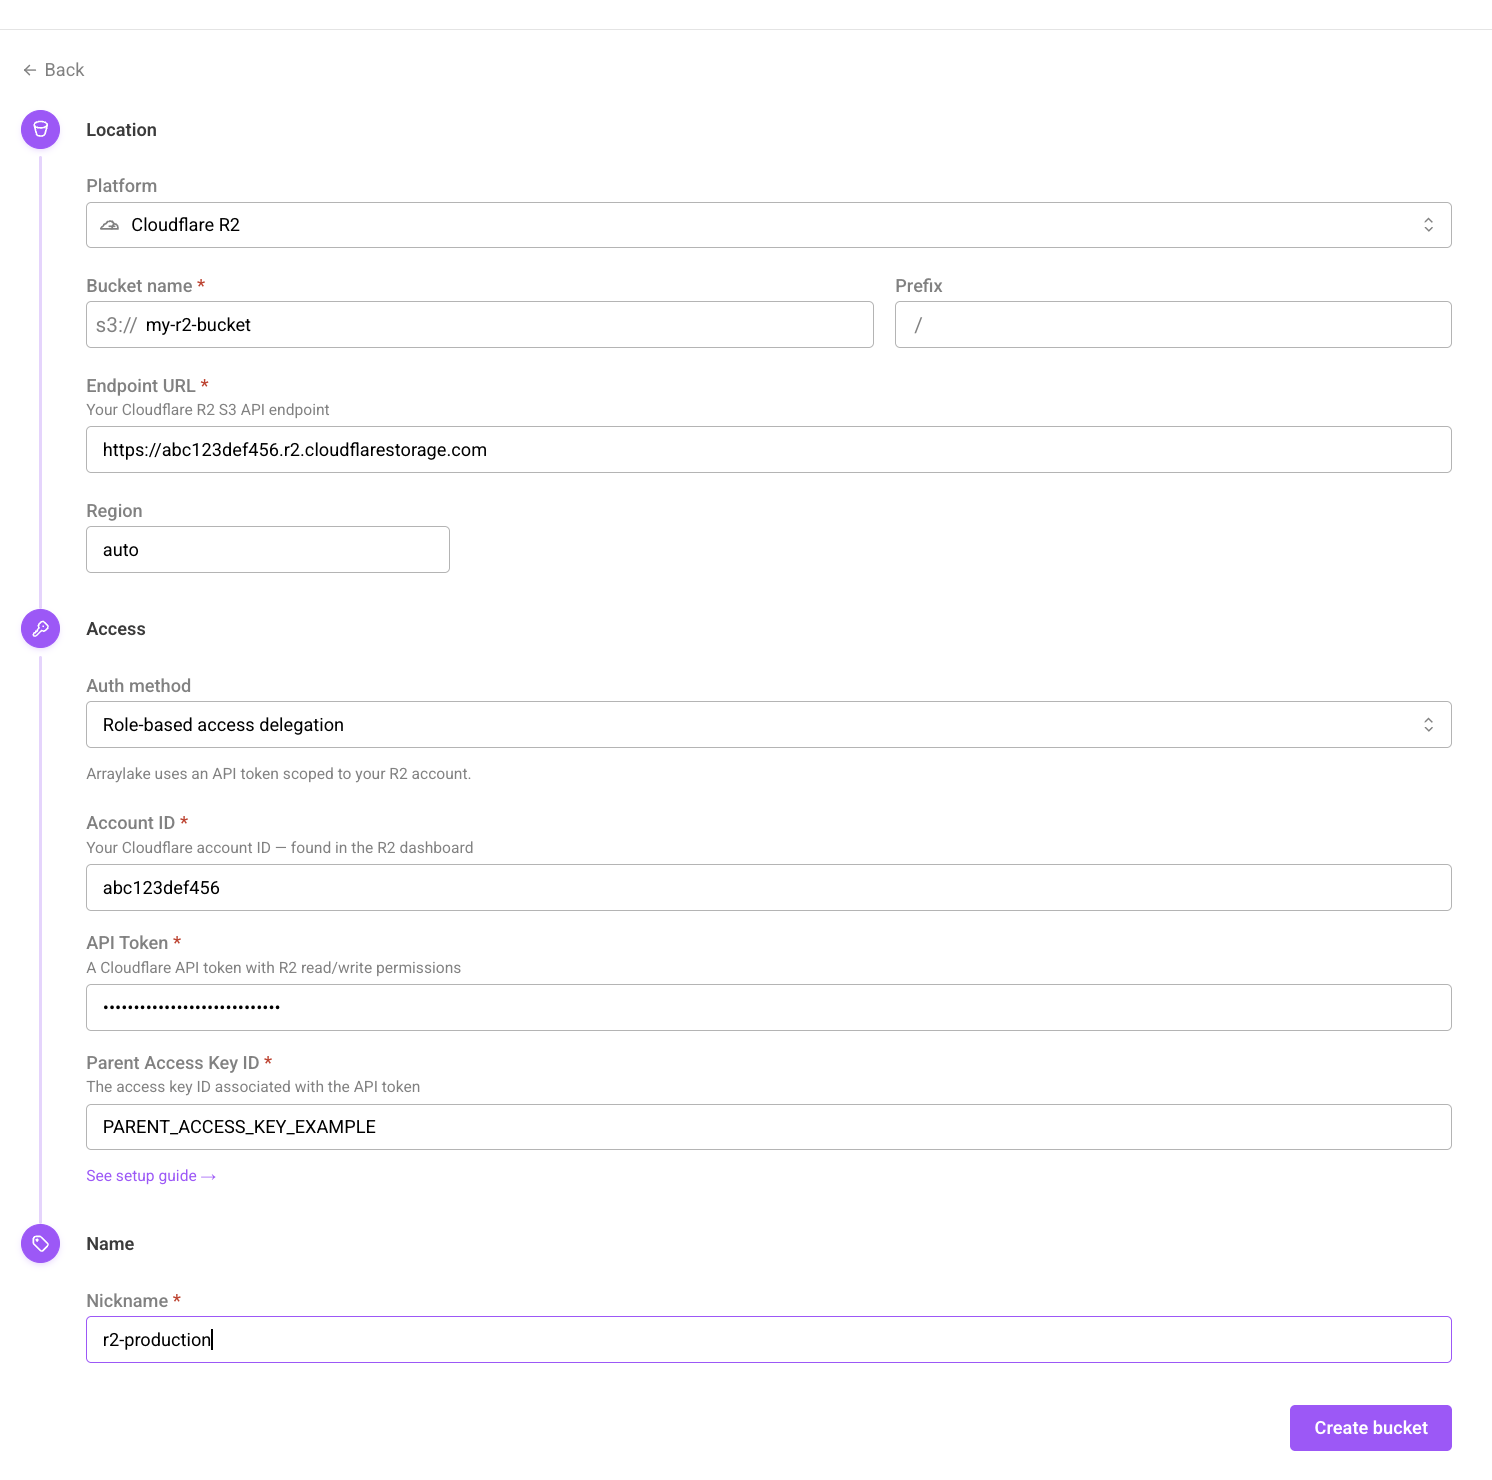
The create bucket form using role-based access delegation for Cloudflare R2 storage.
Pass your Account ID, Token Value, and Access Key Id using the auth_config kwarg as shown below:
from arraylake import Client


client = Client()

client.create_bucket_config(
  org="earthmover",
  nickname="production",
  uri="s3://my-production-data",
  extra_config={
    "endpoint_url": "https://<account-id>.r2.cloudflarestorage.com",
    "region_name": "ENAM"
  },
  auth_config={
    "method": "r2_customer_managed_role",
    "external_account_id": "cloudflare-account-id",
    "account_api_token": "token-value",
    "parent_access_key_id": "access-key-id"
  }
)
Pass your Account ID, Token Value, and Access Key Id using the auth_config kwarg as shown below:
from arraylake import AsyncClient


aclient = AsyncClient()

await aclient.create_bucket_config(
  org="earthmover",
  nickname="production",
  uri="s3://my-production-data",
  extra_config={
    "endpoint_url": "https://<account-id>.r2.cloudflarestorage.com",
    "region_name": "ENAM"
  },
  auth_config={
    "method": "r2_customer_managed_role",
    "external_account_id": "cloudflare-account-id",
    "account_api_token": "account-api-token",
    "parent_access_key_id": "s3-access-key-id-for-token"
  }
)
Azure Blob Storage
For Azure Blob Storage, Earthmover uses Azure AD (Entra ID) authentication to request User Delegation Keys on your behalf. These keys are used to generate temporary, container-scoped SAS (Shared Access Signature) tokens for accessing your Azure storage.
Azure does not support scoping SAS tokens to container prefixes. SAS tokens generated via storage blob delegation are container-level only, meaning they can access all data in the container, not just the repository data. While Arraylake will only use these credentials to access repository data, anyone with access to these credentials can access any data within the container.
Recommendations:
- Do not store other sensitive data in the same container as a repository using Azure delegated credentials.
- Consider using separate containers for repositories with sensitive information.
To enable this credentials delegation model, you must grant Earthmover's application two roles on your storage account:
- Storage Blob Delegator - Allows Earthmover to obtain user delegation keys for signing SAS tokens
- Storage Blob Data Contributor - Allows Earthmover to grant data-plane permissions (read, write, list, delete) in the SAS tokens
Both roles are required because Azure splits these responsibilities:
- Storage Blob Delegator grants permission to sign SAS tokens using Azure AD authentication
- Storage Blob Data Contributor grants permission to authorize data operations in those SAS tokens
Without both roles, the generated SAS tokens will lack the necessary permissions and Arraylake operations will fail with authorization errors.
SAS tokens are valid for 1 hour and currently do not automatically refresh. Automatic refresh support is in development.
Follow the steps below to give Earthmover's Azure service principal permission to delegate blob storage account credentials on your behalf:
Step 1: Provision the Service Principal for Earthmover's Storage Delegator App
To make Earthmover's multi-tenant Azure AD app registration discoverable in your tenant so you can assign IAM roles to its service principal, you must first create (provision) the service principal for that app inside your tenant.
This step requires your Azure user account to have sufficient permissions. Generally you must have one of the following roles:
- Global Administrator
- Application Administrator
- Cloud Application Administrator
You can check which roles your account has in:
Azure Portal → Azure Active Directory → Roles and administrators
This can be done via the Azure CLI:
az ad sp create --id 56cecba1-4f11-4315-934e-c46a6f4e12c0
or PowerShell:
Connect-AzureAD
$appId = "56cecba1-4f11-4315-934e-c46a6f4e12c0"
New-AzureADServicePrincipal -AppId $appId
where 56cecba1-4f11-4315-934e-c46a6f4e12c0 is the application (client) ID of the storage delegator app maintained by Earthmover. This app must be granted permissions via a service principal in your tenant to create temporary, scoped credentials.
This step cannot be done via the Azure Portal. For private multi-tenant apps, creating a service principal in another tenant can only be done via CLI or PowerShell. The portal requires the app to be published in the Azure AD gallery, which involves submitting the app for review by Microsoft—a process that can take time and is currently restricted.
This creates a service principal in your tenant called Earthmover Storage Delegator.
Step 2: Navigate to your Storage Account in the Azure Portal
- Open the Azure Portal and navigate to Storage accounts.
- Click on the storage account that you want to use with Arraylake.
- Verify the breadcrumb at the top reads:
<your subscription> / Storage accounts / <your-storage-account>.
Step 3: Open Access Control (IAM)
- In the left menu of the storage account page, click Access control (IAM).
- Click + Add → Add role assignment. This opens a 3-step wizard.
Step 4: Assign Storage Blob Delegator Role
- In the Role tab, use the search box to find and select Storage Blob Delegator.
- Click Next.
- Leave Assign access to set to User, group, or service principal.
- Click + Select members.
- In the side panel, search for the Earthmover application by name (
Earthmover Storage Delegator) or by the client ID (56cecba1-4f11-4315-934e-c46a6f4e12c0). - Select the Earthmover service principal and click Select.
- Click Next.
- Review the assignment details and click Review + assign.
Step 5: Assign Storage Blob Data Contributor Role
Now you need to assign the second required role. Repeat the role assignment process:
- In the Access control (IAM) page, click + Add → Add role assignment again.
- In the Role tab, use the search box to find and select Storage Blob Data Contributor.
- Click Next.
- Leave Assign access to set to User, group, or service principal.
- Click + Select members.
- Search for the Earthmover application by name (
Earthmover Storage Delegator) or by the client ID (56cecba1-4f11-4315-934e-c46a6f4e12c0). - Select the Earthmover service principal and click Select.
- Click Next.
- Review the assignment details and click Review + assign.
The Storage Blob Data Contributor role can be assigned at the container level rather than the storage account level if preferred. We recommend the storage account scope so permissions will apply to all containers within the storage account. If assigning at the container level, this RBAC role will need to be assigned individually to every container that Arraylake will need access to.
After both assignments complete, the Earthmover service principal will appear in your storage account's role assignments list with both the Storage Blob Delegator and Storage Blob Data Contributor roles.
Azure enforces a strict separation of concerns for SAS token generation:
-
Storage Blob Delegator grants permission to obtain user delegation keys, which are required to sign SAS tokens using Azure AD authentication. However, this role grants zero data-plane permissions (no read, write, list, or delete access).
-
Storage Blob Data Contributor grants the actual data-plane permissions (read, write, list, delete blobs). When generating a SAS token, Azure checks whether the caller has the permissions they're trying to encode in the SAS. Without this role, Azure will silently strip out the permissions from the SAS token, causing operations to fail with authorization errors.
Why Storage Account Scope? User delegation keys are account-level operations, so the Storage Blob Delegator role must be assigned at the storage account scope. The Storage Blob Data Contributor role can be assigned at the storage account or container level, but assigning it at the storage account scope allows Earthmover to generate SAS tokens for multiple containers within the same storage account.
Configuring Arraylake to use Azure Delegated Access
Once you have granted Earthmover both the Storage Blob Delegator and Storage Blob Data Contributor roles, you can create a BucketConfig for your Azure container, setting the credential type to "Credential Delegation" in the web app OR azure_credential_delegation in Python. You will need to provide your Azure Tenant ID (Directory ID) and Storage Account Name in the auth_config:
Your Tenant ID (Directory ID) is required to authenticate the Azure service principal. You can find it in the Azure Portal under Azure Active Directory → Overview → Tenant ID.
The storage account entered here must be the same one where the Earthmover service principal was granted Storage Blob Delegator and Storage Blob Data Contributor permissions. This ensures the SAS tokens can be generated for the correct container.
Azure uses the term container to refer to the organizational unit that holds blobs (objects) within a storage account. This is equivalent to what AWS calls a bucket and what GCS calls a bucket. In Arraylake, we use the AWS-native term "bucket" across all storage providers for consistency, but when working with Azure, your BucketConfig points to an Azure container.
- Web App
- Python
- Python (asyncio)
In the web app, select Azure Blob Storage as the platform, then set the credential type to "Credential Delegation". Provide your Azure Tenant ID and Storage Account Name.
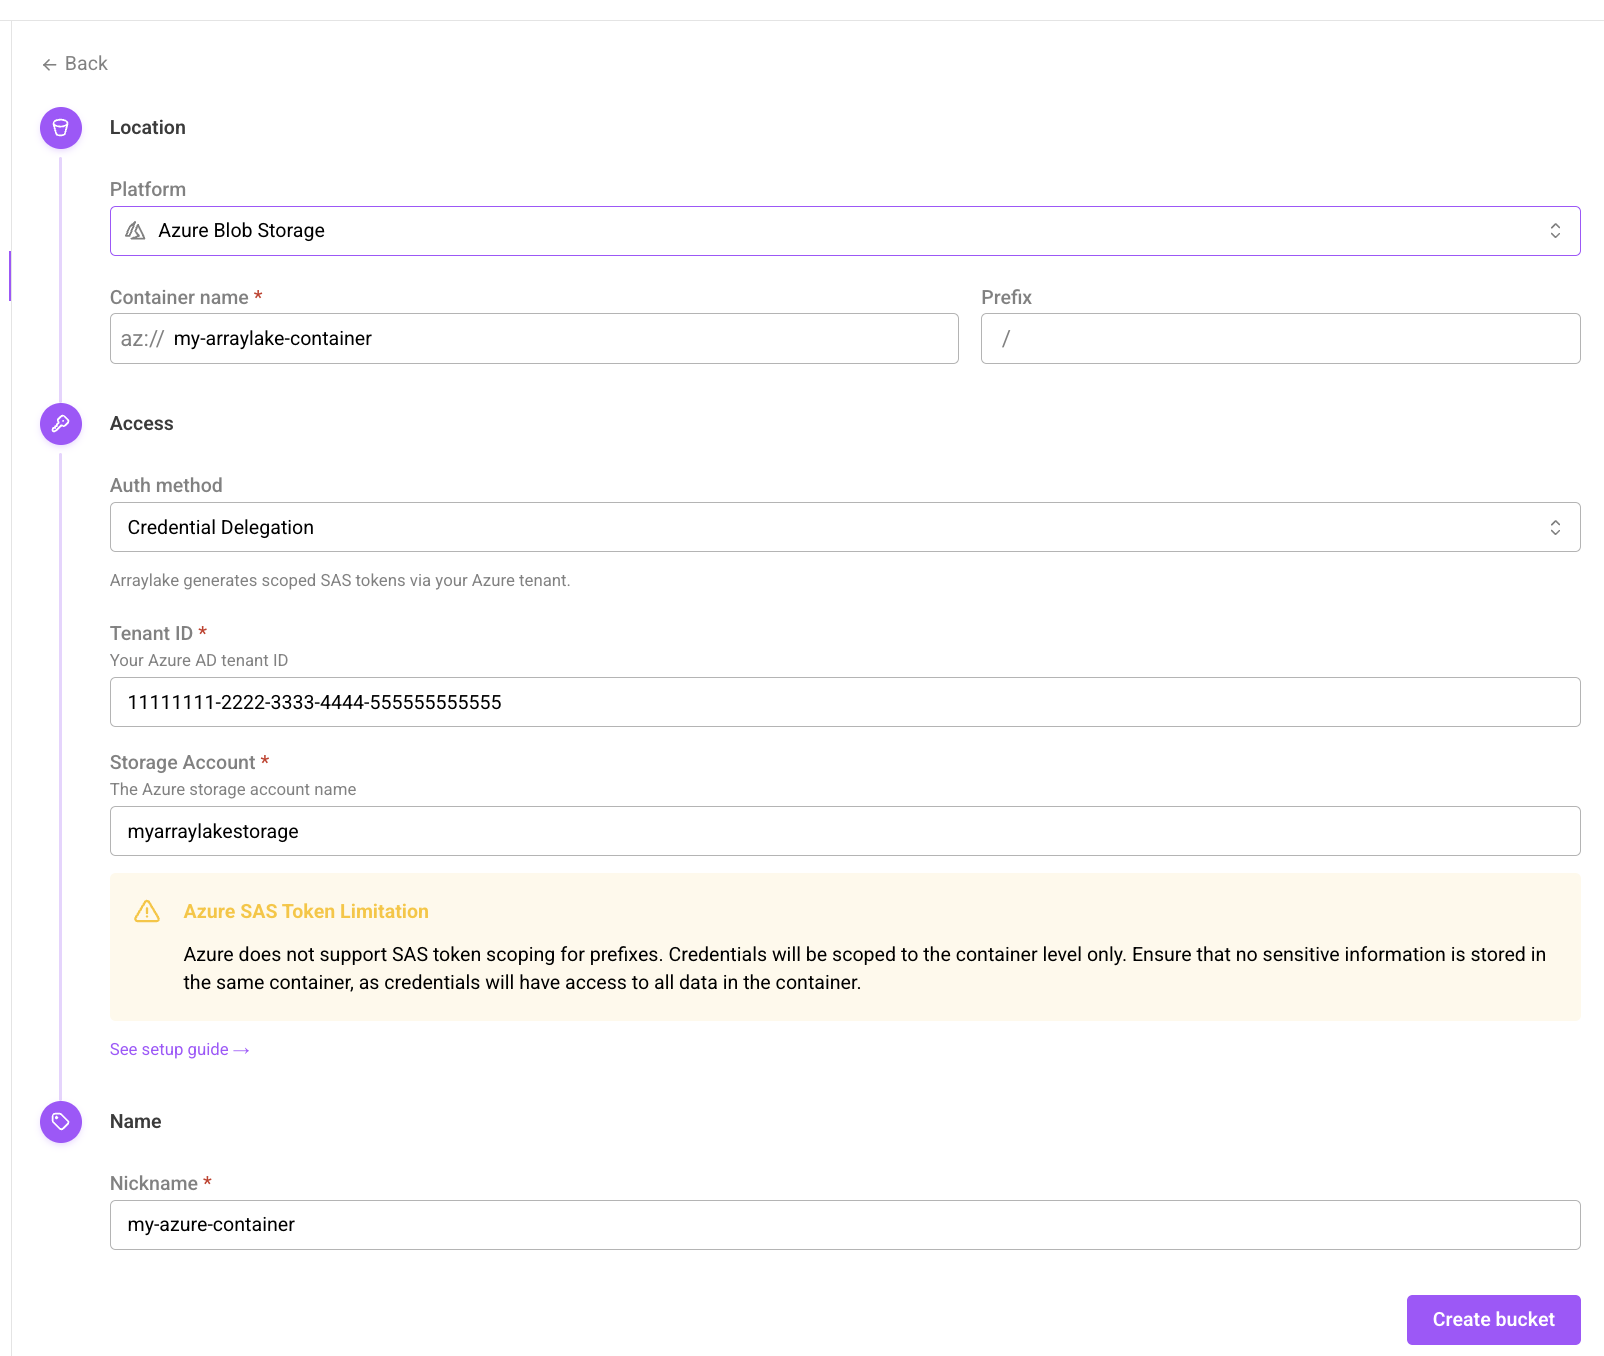
The create bucket form using credential delegation for Azure blob storage.
from arraylake import Client


client = Client()

client.create_bucket_config(
  org="earthmover",
  nickname="azure-production",
  uri="az://my-container-name",
  auth_config={
    "method": "azure_credential_delegation",
    "tenant_id": "your-azure-tenant-id",
    "storage_account": "yourstorageaccountname"
  }
)
from arraylake import AsyncClient


aclient = AsyncClient()

await aclient.create_bucket_config(
  org="earthmover",
  nickname="azure-production",
  uri="az://my-container-name",
  auth_config={
    "method": "azure_credential_delegation",
    "tenant_id": "your-azure-tenant-id",
    "storage_account": "yourstorageaccountname"
  }
)
That's it! You can now start interacting with your Azure container via Arraylake, which will manage credentials using user delegation SAS tokens.
Unlike AWS S3, Azure SAS tokens are scoped at the container level, not the prefix level. While you can specify a prefix in your bucket configuration, the SAS token will grant access to the entire container.
List BucketConfigs
You can list BucketConfigs associated with an organization.
- Web App
- Python
- Python (asyncio)
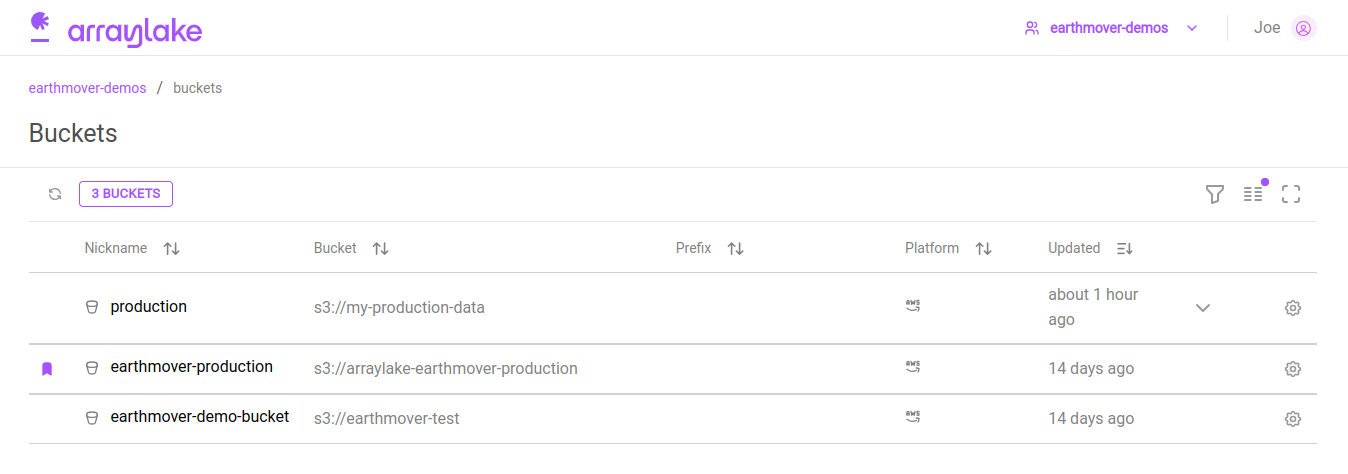
The organization buckets list
In the web app, users can view existing buckets for their org from the org buckets section (app.earthmover.io/[orgname]/buckets).
The default BucketConfig is marked with a purple badge.
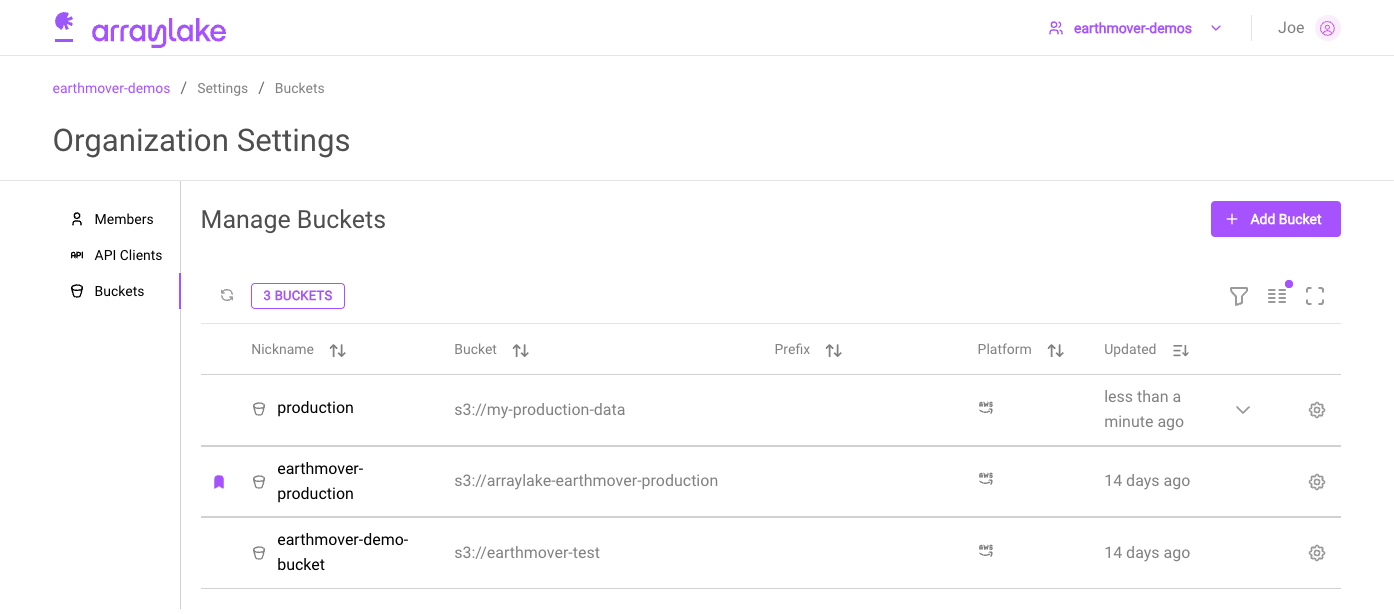
The organization settings buckets section
Org Admins can also access and manage the buckets list via the Buckets section on the Organizations Settings page (app.earthmover.io/[orgname]/settings).
Clicking on the gear icon in the bucket's row will open the settings page for that bucket.
client.list_bucket_configs("earthmover")
In the Python Client, the default BucketConfig will be indicated by the is_default flag on the resulting
list item.
await aclient.list_bucket_configs("earthmover")
In the Python Client, the default BucketConfig will be indicated by the is_default flag on the resulting
list item.
Delete a BucketConfig
Finally, we can delete a BucketConfig.
A BucketConfig cannot be deleted while it is in use by any Repo. Deleting a BucketConfig also cannot be undone! Use this operation carefully.
- Web App
- Python
- Python (asyncio)
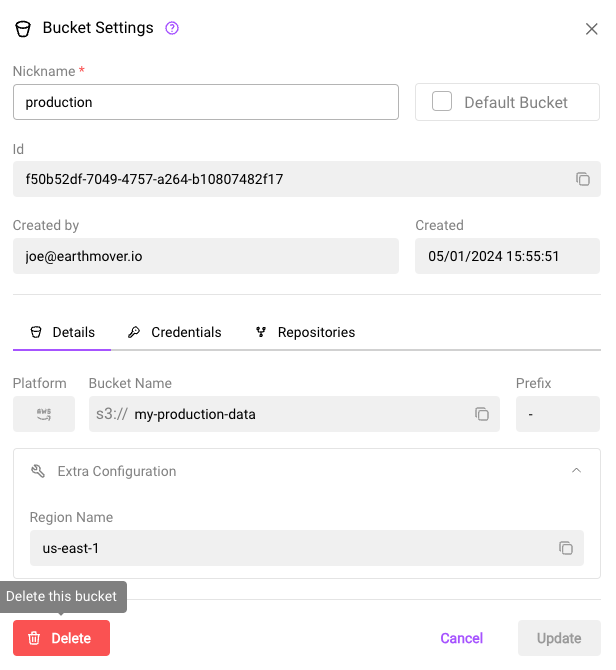
The bucket settings page
In the web app, a BucketConfig can be deleted from the bucket's settings page.
client.delete_bucket_config(
  org="earthmover",
  nickname="production",
  imsure=True, imreallysure=True
)
await aclient.delete_bucket_config(
  org="earthmover",
  nickname="production",
  imsure=True, imreallysure=True
)